RAC to Single Instance Data Guard Physical Standby
This article shows how to setup an Oracle 11.2.0.2 binary on both Solaris 10 and OEL (Oracle Linux Server release 6.4) systems.
It’s intended to describe a Solaris-based installation, though some parts include Linux-based procedures.
Before beginning the installation process it is highly recommended to read the entire article. The process would be easier if a data guard and RAC has already been installed from one instance to another.
This article has the below sections:
- Steps for the Primary Database
- Steps for the Standby Database
- Queries to find the DataGuard status
- Configuration of DataGuard Broker
- Switchover
- Protection Modes
- Shutdown Standby Database
- Startup Standby Database
- Errors & Solutions
|
PRIMARY |
STANDBY |
|
|
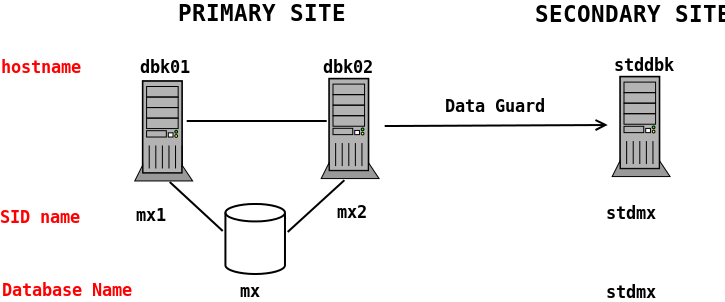
Hostname/s |
dbk01, dbk02 | stddbk |
|
Database Name |
mx |
mx |
|
Database Unique Name |
mx |
stdmx |
|
Net Service Name |
mx.sysdba.org |
stdmx.sysdba.org |
|
Clusterware |
11g R2 Grid Infrastructure (11.2.0.2) |
11g R2 Grid Infrastructure (11.2.0.2) |
|
Cluster Nodes |
node1, node2 (2-node RAC) |
Single instance |
|
SCAN |
mx-scan |
– |
|
SCAN listener Host/port |
SCAN VIPs (port 1521) |
|
|
DB Instances |
mx1, mx2 | stdmx |
|
DB STORAGE |
ASM | ASM |
|
File Management |
||
|
ASM diskgroup for DB files |
DATA | DATA |
|
ASM diskgroup for recovery files |
FRA | FRA |
|
GRID_HOME |
/u01/11.2.0/grid | /u01/11.2.0/grid |
|
ORACLE_HOME |
/u01/app/oracle/product/11.2.0/db_1 | /u01/app/oracle/product/11.2.0/db_1 |
|
OS |
SUN 10u10 | SUN 10u10 |
|
RDBMS Version |
11.2.0.2 | 11.2.0.2 |
|
Grid Version |
11.2.0.2 | 11.2.0.2 |
– Standby Server
- Setup both Grid Infrastructure and Stand Alone Server
- Create the DATA and FRA groups using ASMCA (ASM Configuration Assistant)
– Set up RDBMS only, without a database instance.
– Make sure whether the DATA and FRA groups in the Primary’s RedoLogs, consist of 2 groups each. If not, then create these groups.
You can find the files listed here in this zip file: config_parameter_files.zip
- .bash_profile/.profile
- listener.ora
- tnsnames.ora
- startup parameters (pfile)
|
1 2 3 4 |
dba::101:oracle,grid asmadmin::102:grid asmdba::103:grid,oracle asmoper::104:grid |
Steps for the Primary Database
Step 1. Place the Primary Database into Archive Mode
|
1 2 3 4 5 6 |
archive log list; Database log mode No Archive Mode Automatic archival Disabled Archive destination USE_DB_RECOVERY_FILE_DEST Oldest online log sequence 407 Current log sequence 408 |
Check redolog deatils
|
1 2 3 |
set linesize 1200 col member format a70 select * from v$logfile; |
|
1 2 |
column member format a50 select f.member,l.bytes/1024/1024 as "Size in MB" from v$log l,v$logfile f where l.group#=f.group#; |
|
1 2 3 4 |
alter system set db_recovery_file_dest_size=40g scope=both sid='*'; alter system set db_recovery_file_dest='+fra' scope=both sid='*'; alter system set log_archive_dest_1='location=+fra' scope=both sid='*'; alter system set log_archive_format='arch_%t_%s_%r.arc' scope=spfile; |
Close all instances using srvctl
|
1 2 3 4 5 |
$ srvctl stop database -d mx $ sqlplus "/ as sysdba" startup mount alter database archivelog; shutdown immedite |
Open the databases
|
1 |
$ srvctl start database -d mx |
To check
|
1 |
archive log list |
Step 2. Enable Force Logging (if using fast start fail over) & configure the service
|
1 2 |
alter database force logging; alter system set service_names='mx,mx.sysdba.org' scope=both sid='*'; |
Step 3. Creating the Standby RedoLogs
Important notes:
• Don’t create the standby redologs using an alias as shown below.
• Don’t create online redo logs or standby redo logs in areas using automatic storage management (ASM) using this method:
• There are performance benefits to creating an additional user.
There are 2 redo logs in every node, as well as these the DBA should create an additional redo log for each node (as a backup).
|
1 2 3 4 |
ALTER DATABASE ADD STANDBY LOGFILE THREAD 1 GROUP 30 ('+DATA/mx/onlinelog/STDredo030a.log','+FRA/mx/onlinelog/STDredo030b.log') SIZE 100m, GROUP 40 ('+DATA/mx/onlinelog/STDredo040a.log','+FRA/mx/onlinelog/STDredo040b.log') SIZE 100m, GROUP 50 ('+DATA/mx/onlinelog/STDredo050a.log','+FRA/mx/onlinelog/STDredo050b.log') SIZE 100m; |
|
1 2 3 4 |
ALTER DATABASE ADD STANDBY LOGFILE THREAD 2 GROUP 60 ('+DATA/mx/onlinelog/STDredo060a.log','+FRA/mx/onlinelog/STDredo060b.log') SIZE 100m, GROUP 70 ('+DATA/mx/onlinelog/STDredo070a.log','+FRA/mx/onlinelog/STDredo070b.log') SIZE 100m, GROUP 80 ('+DATA/mx/onlinelog/STDredo080a.log','+FRA/mx/onlinelog/STDredo080b.log') SIZE 100m |
Should be created in the following way.
|
1 2 3 4 |
ALTER DATABASE ADD STANDBY LOGFILE THREAD 1 GROUP 5 SIZE 100M, GROUP 6 SIZE 100M, GROUP 7 SIZE 100M; |
|
1 2 3 4 |
ALTER DATABASE ADD STANDBY LOGFILE THREAD 2 GROUP 8 SIZE 100M, GROUP 9 SIZE 100M, GROUP 10 SIZE 100M; |
Recommendation: Create the redo logs after setting up the Data Guard, as it is more likely to be tested after the second configuration.(Both in the Primary and in the Standby)
|
1 2 3 4 5 6 7 8 |
col member format a90 set lines 132 set trims on select group#,type,member from v$logfile; select bytes from v$log; select group#, member from v$logfile ; |
Step 4. Create the password files (orapw$instance_name)
(The password should be the same in all the machines)
In all of the nodes
|
1 2 3 |
orapwd file=$ORACLE_HOME/dbs/orapwstdmx password=0racle ignorecase=y force=y orapwd file=$ORACLE_HOME/dbs/orapwmx1 password=0racle ignorecase=y force=y orapwd file=$ORACLE_HOME/dbs/orapwmx2 password=0racle ignorecase=y force=y |
–ignore case is an important parameter here since from release 11gR2 onwards passwords are case-sensitive
PING[ARC2]: Heartbeat failed to connect to standby ‘mx’. Error is 16191.
Error 1017 received logging on to the standby
These are common errors associated with password files. If you encounter the above errors, recreate the password files.
Step 5. Enter the Session ID (SID) information into listener.ora (in all of the machines including standby ones).
Primary (the same as the RAC-GRID HOME 2 node)
|
1 2 3 4 5 6 7 8 9 10 11 12 13 14 15 16 17 18 19 20 21 22 23 24 25 26 27 28 29 30 31 32 33 34 35 36 37 38 39 40 41 42 43 44 45 46 47 |
LISTENER=(DESCRIPTION=(ADDRESS_LIST=(ADDRESS=(PROTOCOL=IPC)(KEY=LISTENER)))) # line added by Agent LISTENER_SCAN3=(DESCRIPTION=(ADDRESS_LIST=(ADDRESS=(PROTOCOL=IPC)(KEY=LISTENER_SCAN3)))) # line added by Agent LISTENER_SCAN2=(DESCRIPTION=(ADDRESS_LIST=(ADDRESS=(PROTOCOL=IPC)(KEY=LISTENER_SCAN2)))) # line added by Agent LISTENER_SCAN1=(DESCRIPTION=(ADDRESS_LIST=(ADDRESS=(PROTOCOL=IPC)(KEY=LISTENER_SCAN1)))) # line added by Agent ENABLE_GLOBAL_DYNAMIC_ENDPOINT_LISTENER_SCAN1=ON # line added by Agent ENABLE_GLOBAL_DYNAMIC_ENDPOINT_LISTENER_SCAN2=ON # line added by Agent ENABLE_GLOBAL_DYNAMIC_ENDPOINT_LISTENER_SCAN3=ON # line added by Agent ENABLE_GLOBAL_DYNAMIC_ENDPOINT_LISTENER=ON # line added by Agent #################################################### stdmx = (DESCRIPTION_LIST = (DESCRIPTION = (ADDRESS = (PROTOCOL = TCP)(HOST = stddbk.sysdba.org)(PORT = 1521)) ) ) SID_LIST_LISTENER = (SID_LIST = (SID_DESC = (GLOBAL_DBNAME = mx.sysdba.org) (ORACLE_HOME = /u01/11.2.0/grid) (SID_NAME = mx) ) (SID_DESC = (GLOBAL_DBNAME = stdmx.sysdba.org) (ORACLE_HOME= /u01/11.2.0/grid) (SID_NAME = stdmx) ) (SID_DESC = (GLOBAL_DBNAME = mx_DGMGRL) (ORACLE_HOME= /grid/11.2.0/grid) (SID_NAME = mx) ) (SID_DESC = (GLOBAL_DBNAME = stdmx_DGMGRL) (ORACLE_HOME= /u01/11.2.0/grid) (SID_NAME = stdmx) ) ) |
“lsnrctl status” should appear both in standby and primary instances. If it doesn’t, it may be necessary to setup the local_listener parameter (alter local_lister / register).
Step 6. tnsname.ora
In all of the nodes as well as the standby nodes
|
1 2 3 4 5 6 7 8 9 10 11 12 13 14 15 16 17 |
mx = (DESCRIPTION = (ADDRESS = (PROTOCOL = TCP)(HOST = murex-scan)(PORT = 1521)) (CONNECT_DATA = (SERVER = DEDICATED) (SERVICE_NAME = mx.sysdba.org) ) ) stdmx = (DESCRIPTION = (ADDRESS = (PROTOCOL = TCP)(HOST = stddbk.sysdba.org)(PORT = 1521)) (CONNECT_DATA = (SERVER = DEDICATED) (SERVICE_NAME = stdmx.sysdba.org) ) ) |
|
1 2 3 4 5 6 7 8 |
$tnsping stdmx TNS Ping Utility for Solaris: Version 11.2.0.2.0 - Production on 25-APR-2013 18:33:54 Copyright (c) 1997, 2010, Oracle. All rights reserved. Used parameter files: Used TNSNAMES adapter to resolve the alias Attempting to contact (DESCRIPTION = (ADDRESS = (PROTOCOL = TCP)(HOST = stddbk.sysdba.org)(PORT = 1521)) (CONNECT_DATA = (SERVER = DEDICATED) (SERVICE_NAME = stdmx.sysdba.org))) OK (160 msec) |
Step 7. Setting the init.ora parameters for the DataGuard (primary)
First create a backup pfile (send a copy of this file to the standby)
|
1 2 3 4 5 6 7 8 9 10 11 12 13 |
create pfile='/opt/oracle/stage/initprimary_bck.ora from spfile; alter system set log_archive_config='dg_config=(mx,stdmx)' scope=both sid='*'; alter system set log_archive_dest_1='location=use_db_recovery_file_dest valid_for=(all_logfiles,all_roles) db_unique_name=mx' scope=both sid='*'; alter system set log_archive_dest_2='service=stdmx LGWR SYNC AFFIRM max_failure=10 max_connections=5 reopen=180 valid_for=(online_logfiles,primary_role) db_unique_name=stdmx' scope=both sid='*'; alter system set log_archive_dest_state_1='enable' scope=both sid='*'; alter system set log_archive_dest_state_2='enable' scope=both sid='*'; alter system set fal_server='stdmx' scope=both sid='*'; alter system set fal_client='mx' scope=both sid='*'; alter system set log_archive_max_processes=10 scope=both sid='*'; alter system set standby_file_management='AUTO' scope=both sid='*'; alter system set db_file_name_convert='+DATA/STDMX/','+DATA/MX/' scope=spfile sid='*'; alter system set log_file_name_convert='+FRA/STDMX/','+FRA/MX/','+DATA/STDMX/','+DATA/MX/' scope=spfile sid='*'; |
Close, reopen and check the updated values.
In the same directory, in its full state, as initprimary_for_std.ora
|
1 |
create pfile='/opt/oracle/stage/initprimary_for_std.ora from spfile; |
Send this file to standby, rename and update as required
|
1 |
$vi /u01/app/oracle/product/11.2.0/db_1/dbs/initstdmx.ora |
The contents should be as the following
|
1 |
SPFILE='+DATA/stdmx/spfilestdmx.ora' |
This addresses the spfile’s location. The database can’t be opened if the spfile can’t be opened.
Step 8. Create a temporary stage folders for the RMAN backup
Primary/standby (as an oracle user)
|
1 2 3 |
$mkdir /opt/oracle/stage $chmod -R g+w /opt/oracle $mkdir -p /opt/oracle/stage |
Step 9. In the primary database, take a RMAN backup of the standby.
|
1 2 3 4 5 6 7 8 |
$rman target / backup device type disk format '/opt/oracle/stage/mx_%u' database plus archivelog; --It is recommended to take a compressed backup if there is a shortage of space or if there is low network performance between locations backup as compressed backupset database format '/opt/oracle/stage/mx_dbf_%u_%t_%s.rman' plus archivelog format '/opt/oracle/stage/mx_arc_%d_%t_%s.rman' ; backup device type disk format '/opt/oracle/stage/mx_%u' current controlfile for standby; |
|
1 |
$scp /opt/oracle/stage/mx_* stddbk:/opt/oracle/stage/ |
Note: If the network speed between locations is low and the database is large, sending the RMAN backup using another method may be a better option.