Setting up an Oracle 11G R2 Real Application Cluster (RAC) using Single Client Access Name (scan IP)
<<Setup of Node1 Setup of Grid Infrastructure>>
Setup of Node2
After setting up RAC1, RAC2 is easier. Actually, all that needs to be done is to clone RAC1 and change a few settings.
Step 1.
Shutdown RAC1’s server using the [b][i]shutdown -h now[/i][/b] command.
Copy RAC1’s folders to RAC2.
Step 2.
Using a text editor open rac1.vmx in the RAC2 folder and change the displayName = “RAC1” to displayName = “RAC2”.
Step 3.
Disconnect the ethernet card connection in the VMWare control panel.
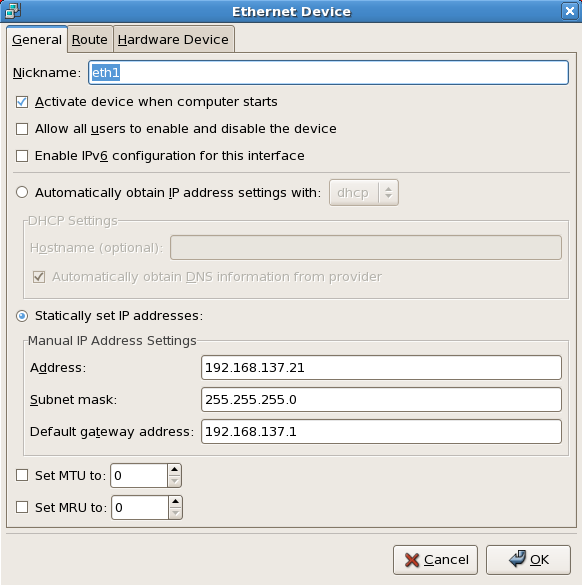
Open system and change hostname, ip addresses and profile information.


Tick the Connected checkbox in the VMWare’s Network Card settings and restart the server.
Check to see if the disks are visible and that the TCP IP has been configuredcorrectly.
|
1 2 3 4 5 6 7 8 9 10 11 12 13 14 15 16 17 18 19 20 21 22 23 24 25 26 27 28 29 30 31 32 33 34 35 36 37 38 39 40 41 42 43 44 45 46 47 48 49 50 51 52 53 54 55 56 57 58 59 60 61 62 63 64 65 66 67 68 69 70 71 72 73 74 75 76 77 78 79 |
ping -c 2 nas ping -c 2 rac1 ping -c 2 rac2 ping -c 2 rac1-priv ping -c 2 rac2-priv [root@rac2 ~] $ fdisk -l Disk /dev/sda: 64.4 GB, 64424509440 bytes 255 heads, 63 sectors/track, 7832 cylinders Units = cylinders of 16065 * 512 = 8225280 bytes Device Boot Start End Blocks Id System /dev/sda1 * 1 13 104391 83 Linux /dev/sda2 14 7832 62806117+ 8e Linux LVM Disk /dev/dm-0: 60.0 GB, 60095987712 bytes 255 heads, 63 sectors/track, 7306 cylinders Units = cylinders of 16065 * 512 = 8225280 bytes Disk /dev/dm-0 doesn't contain a valid partition table Disk /dev/dm-1: 4194 MB, 4194304000 bytes 255 heads, 63 sectors/track, 509 cylinders Units = cylinders of 16065 * 512 = 8225280 bytes Disk /dev/dm-1 doesn't contain a valid partition table Disk /dev/sdb: 102.3 GB, 102374572032 bytes 255 heads, 63 sectors/track, 12446 cylinders Units = cylinders of 16065 * 512 = 8225280 bytes Device Boot Start End Blocks Id System /dev/sdb1 1 12446 99972463+ 83 Linux Disk /dev/sdc: 102.3 GB, 102374572032 bytes 255 heads, 63 sectors/track, 12446 cylinders Units = cylinders of 16065 * 512 = 8225280 bytes Device Boot Start End Blocks Id System /dev/sdc1 1 12446 99972463+ 83 Linux Disk /dev/sdd: 102.3 GB, 102374572032 bytes 255 heads, 63 sectors/track, 12446 cylinders Units = cylinders of 16065 * 512 = 8225280 bytes Device Boot Start End Blocks Id System /dev/sdd1 1 12446 99972463+ 83 Linux Disk /dev/sde: 51.1 GB, 51170508800 bytes 64 heads, 32 sectors/track, 48800 cylinders Units = cylinders of 2048 * 512 = 1048576 bytes Disk /dev/sde doesn't contain a valid partition table You have new mail in /var/spool/mail/root |
Step 4.
In the /home/oracle.bash_profile file.
|
1 2 3 4 5 6 7 8 9 10 11 12 13 14 15 16 17 18 19 20 21 22 23 24 25 26 27 28 29 30 31 32 33 34 35 36 37 38 39 40 41 42 43 |
# Oracle Settings TMP=/tmp; export TMP TMPDIR=$TMP; export TMPDIR ORACLE_HOSTNAME=rac2.sysdba.org; export ORACLE_HOSTNAME ORACLE_UNQNAME=rac; export ORACLE_UNQNAME ORACLE_BASE=/oracle; export ORACLE_BASE ORACLE_HOME=$ORACLE_BASE/db_1; export ORACLE_HOME ORACLE_SID=rac2; export ORACLE_SID ORACLE_TERM=xterm; export ORACLE_TERM PATH=/usr/sbin:$PATH; export PATH PATH=$ORACLE_HOME/bin:$PATH; export PATH LD_LIBRARY_PATH=$ORACLE_HOME/lib:/lib:/usr/lib; export LD_LIBRARY_PATH CLASSPATH=$ORACLE_HOME/JRE:$ORACLE_HOME/jlib:$ORACLE_HOME/rdbms/jlib; export CLASSPATH if [ $USER = "oracle" ]; then if [ $SHELL = "/bin/ksh" ]; then ulimit -p 16384 ulimit -n 65536 else ulimit -u 16384 -n 65536 fi fi |
DNS Records can be viewed in the images below.
Before setting up SCAN (Single Client Access Name) IPs they have to respond to pings to show that they are active, this is something that is done automatically during setup.


